FAQs
FAQ Subject
Please follow below steps to factory default ICA-3250V
1. Remove the power and Ethernet cable.
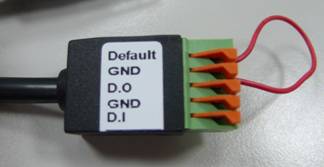
2. Take an electronic wire, plug one side of the wire into "Default" and the other side into "GND" on the terminal block as the picture below.
3. Connect power to the camera again. It takes around 30 seconds to boot the camera.
4. Remove the wire and plug in the Ethernet cable after the camera finishes booting.
5. Use the IPInstaller utility to search your ICA-3250V.
6. Re-login the camera using the default IP (http://192.168.0.20), and user name (admin), password (admin)
You can use the camera utility which is contained in the User’s Manual CD to search the ICA-3250V on your network.
The ICA-3250V supports 10 maximum concurrent users.
The ICA-3250V can send JPEG/AVI files via FTP, SAMBA, and email when motion detected.
Maybe NAT router does not support UPnP function. Please check user’s manual of router and turn on UPnP function.
The first time the PC connects to Network Camera, a pop-up Security Warning window will appear to download ActiveX Controls. When using Windows XP, or Vista, log on with an appropriate account that is authorized to install applications.
Network congestion may prevent the Image screen from appearing quickly. You may choose lower resolution to reduce the required bandwidth.
Go to C:\Windows\Downloaded Program Files and check to see if there is an entry for the file “Web Watch2 Control”. The status column should show “Installed”. If the file is not listed, make sure your Security Settings in Internet Explorer are configured properly and then try reloading the device’s home page. Most likely, the ActiveX control did not download and install correctly. Check your Internet Explorer security settings and then close and restart Internet Explorer. Try to browse and log in again.